The Basics
Strumming the correct strings on the A and D chord.
When you first start playing guitar, it can be difficult to know which strings to strum for each chord. In this lesson, we'll focus on the A and D chords and go over the correct strings to strum for each.
Strumming the A Chord
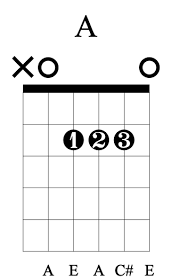
To play the A chord, place your first three fingers on the second fret of the fourth, third, and second strings. Here's a diagram to help:

When strumming the A chord, you should aim to strum only the strings from the open A string down to the high E string. So, you should avoid strumming the low E string. This is because the low E string is not part of the A chord and can make it sound muddy or dissonant.
Strumming the D Chord
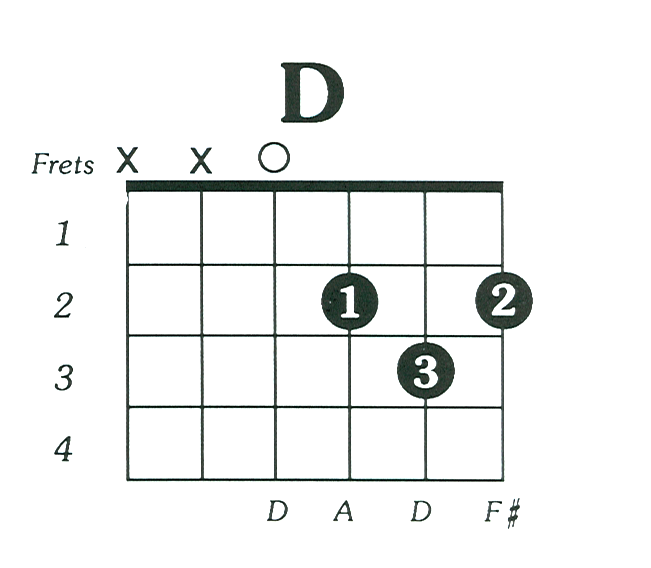
To play the D chord, place your first finger on the second fret of the third string, your second finger on the second fret of the first string, and your third finger on the third fret of the second string. Here's a diagram to help:

When strumming the D chord, you should aim to strum only the strings from the open D string down to the high E string. So, you should avoid strumming the A and low E strings. This is because the A and low E strings are not part of the D chord and can make it sound muddy or dissonant.
Practice Tips
To get comfortable with strumming the right strings for each chord, practice strumming each chord slowly and deliberately, focusing on hitting only the correct strings. Gradually increase your speed as you become more comfortable.
It's also helpful to practice transitioning between the A and D chords while strumming only the correct strings. This will help you develop muscle memory and get comfortable with switching between chords.
Remember, practice makes perfect! The more you practice, the more natural strumming the correct strings will become.